Setting Up Hosts for Your Organization
This guide walks through deploying Permit MCP Gateway for your organization — from creating your first host to onboarding your team and scaling to multiple environments.
What is a host?
A host is a named instance of the Permit MCP Gateway. Each host gets its own subdomain (e.g., acme-pink-panda-6942.agent.security) and provides a complete, isolated security boundary:
- Own subdomain — a unique gateway URL for MCP clients to connect to
- Own Permit environment — policies, roles, and resource definitions are scoped to this host
- Own users and sessions — authentication, consent, and audit trails are isolated per host
- Own MCP servers — each host has its own set of imported upstream servers with independent trust level configurations
Each host maps 1:1 to a Permit.io environment. An environment can only be linked to one host, and a host's environment cannot be changed after creation — to switch environments, delete the host and create a new one.
Step-by-step host setup
1. Sign into the Platform
Go to app.agent.security and create an account or sign in.
2. Connect your Permit.io organization
Connect the Permit.io organization you want to manage:
- Go to Permit.io Settings > API Keys
- Create an organization-scoped API key
- Paste the key into the Permit MCP Gateway platform
Once connected, your organization name appears in the header. You can connect multiple organizations and switch between them using the organization selector.
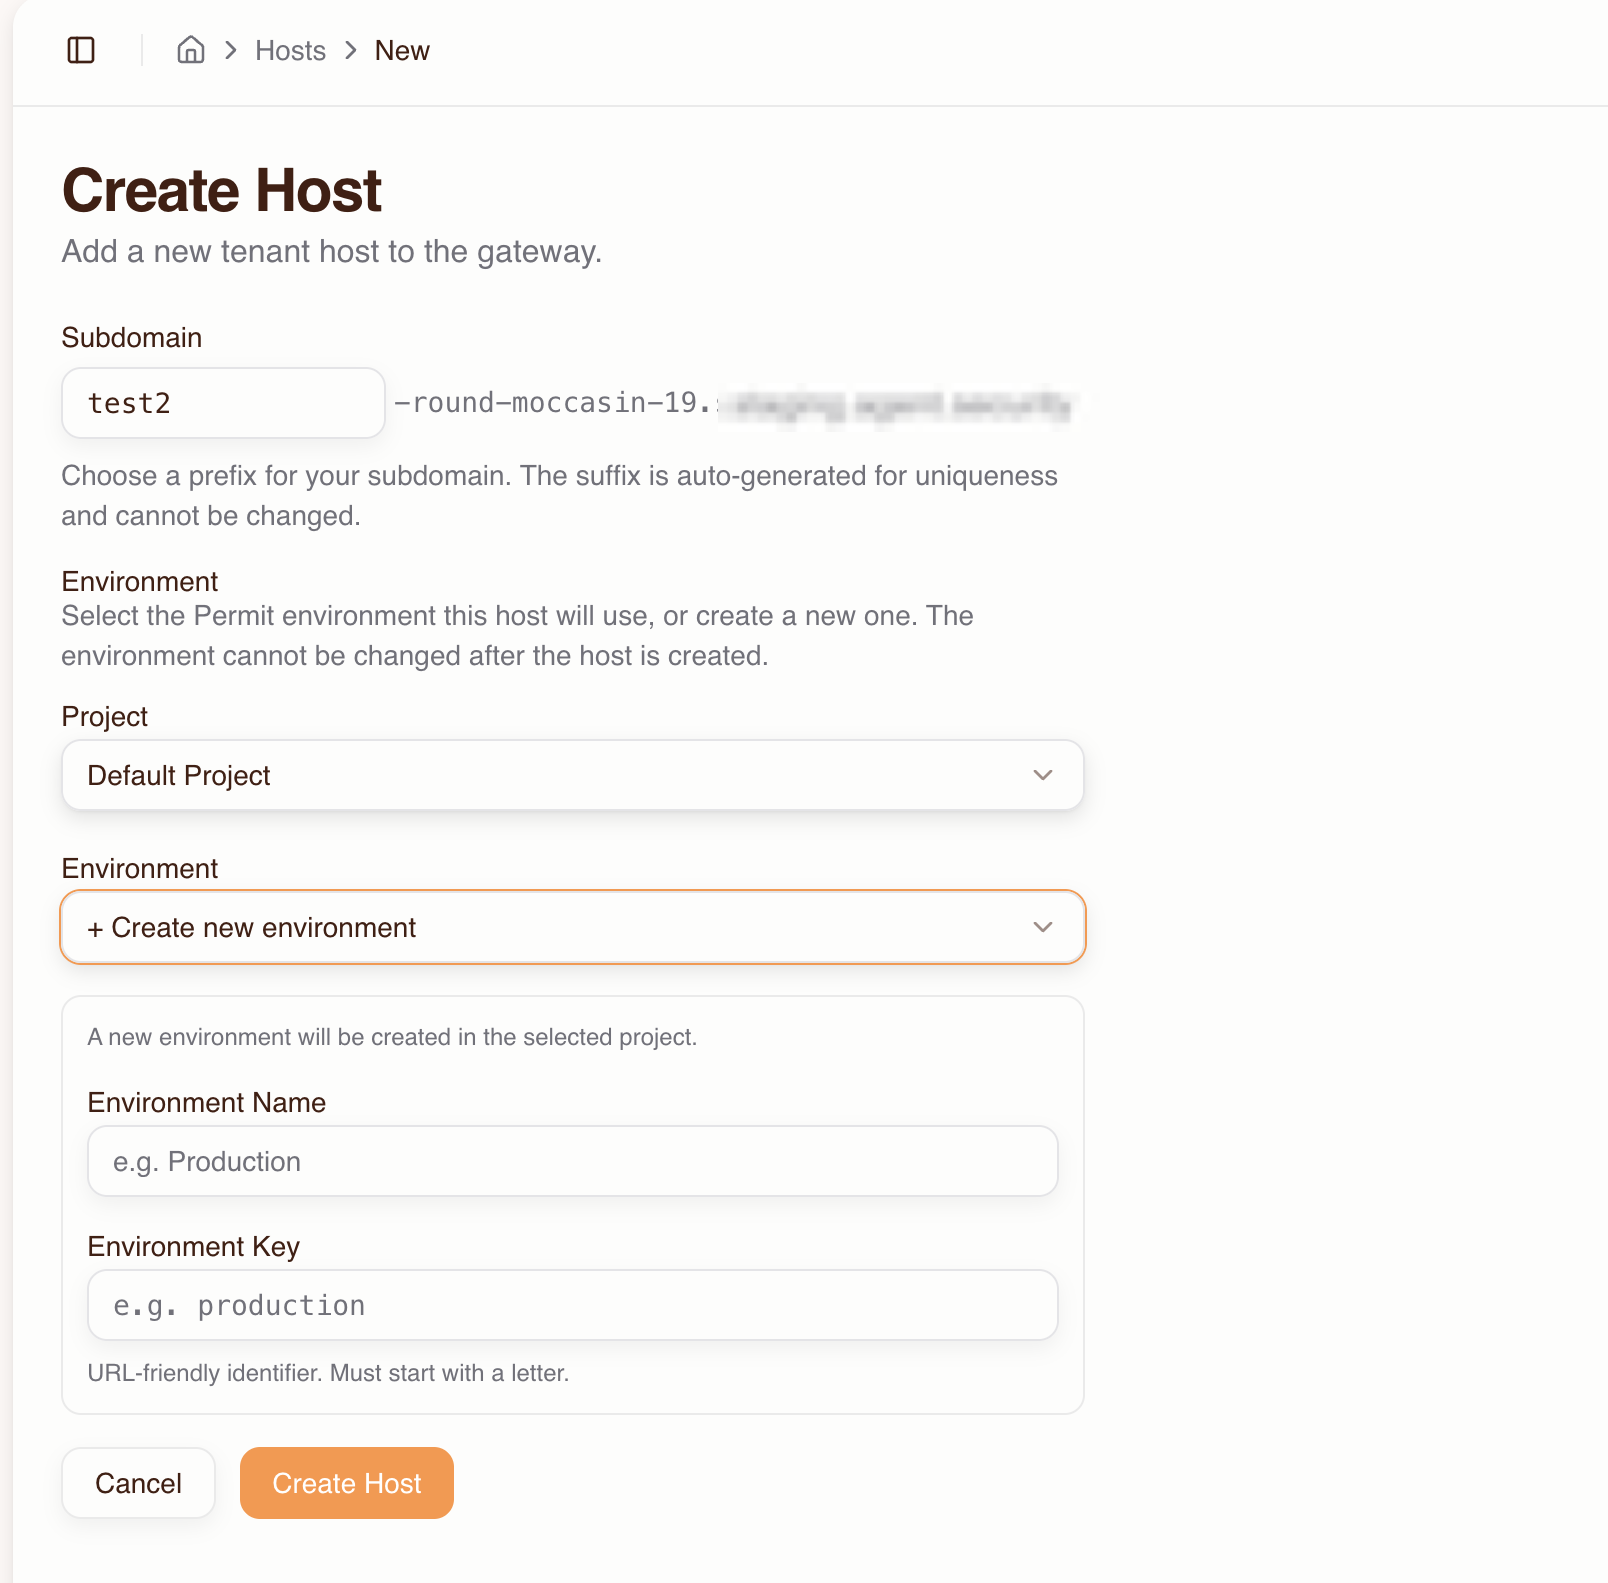
3. Create a host
- Go to the Dashboard and click Create Host
- Fill in:
- Subdomain prefix — choose a name that identifies the host's purpose (e.g.,
acme,acme-staging,engineering). A unique suffix likepink-panda-6942is auto-generated to ensure DNS uniqueness. - Project — select the Permit project that contains the environment you want to use
- Environment — select the Permit environment this host will use. The environment cannot be changed after the host is created.
- Subdomain prefix — choose a name that identifies the host's purpose (e.g.,
- Click Create Host
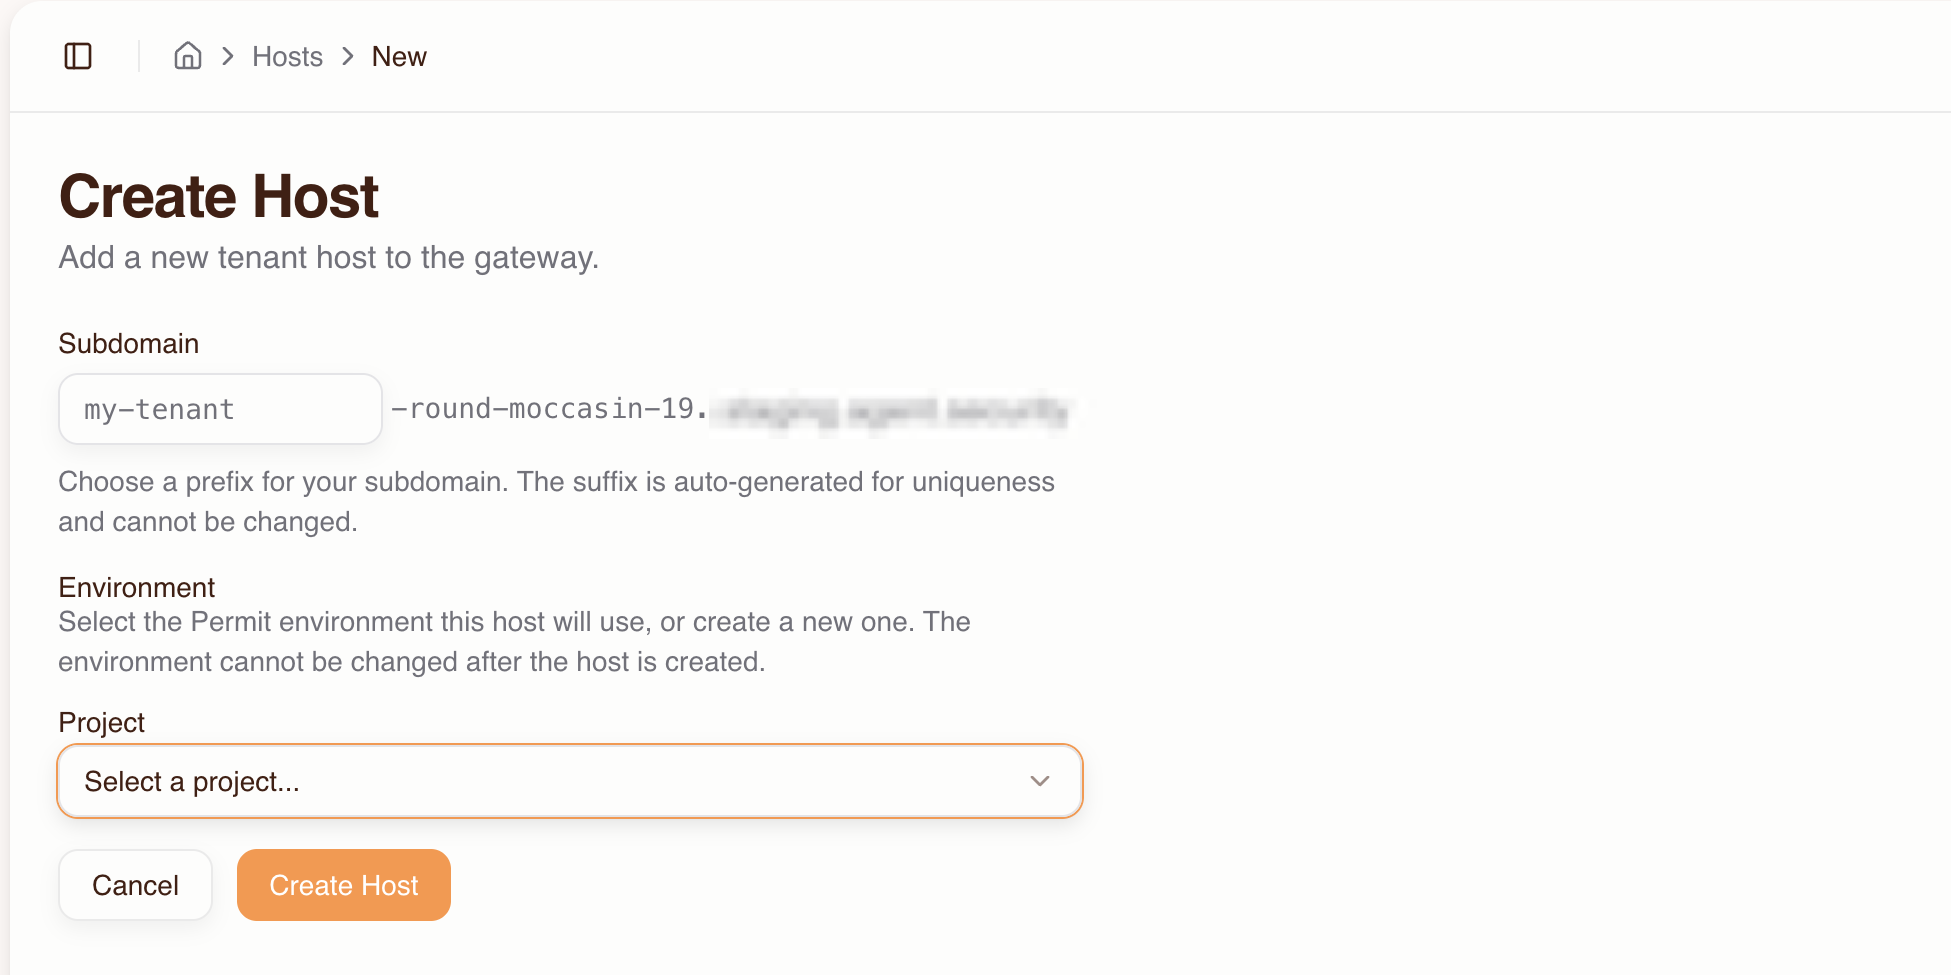
If you need a new Permit environment, select + Create new environment from the Environment dropdown and fill in the environment name and key.
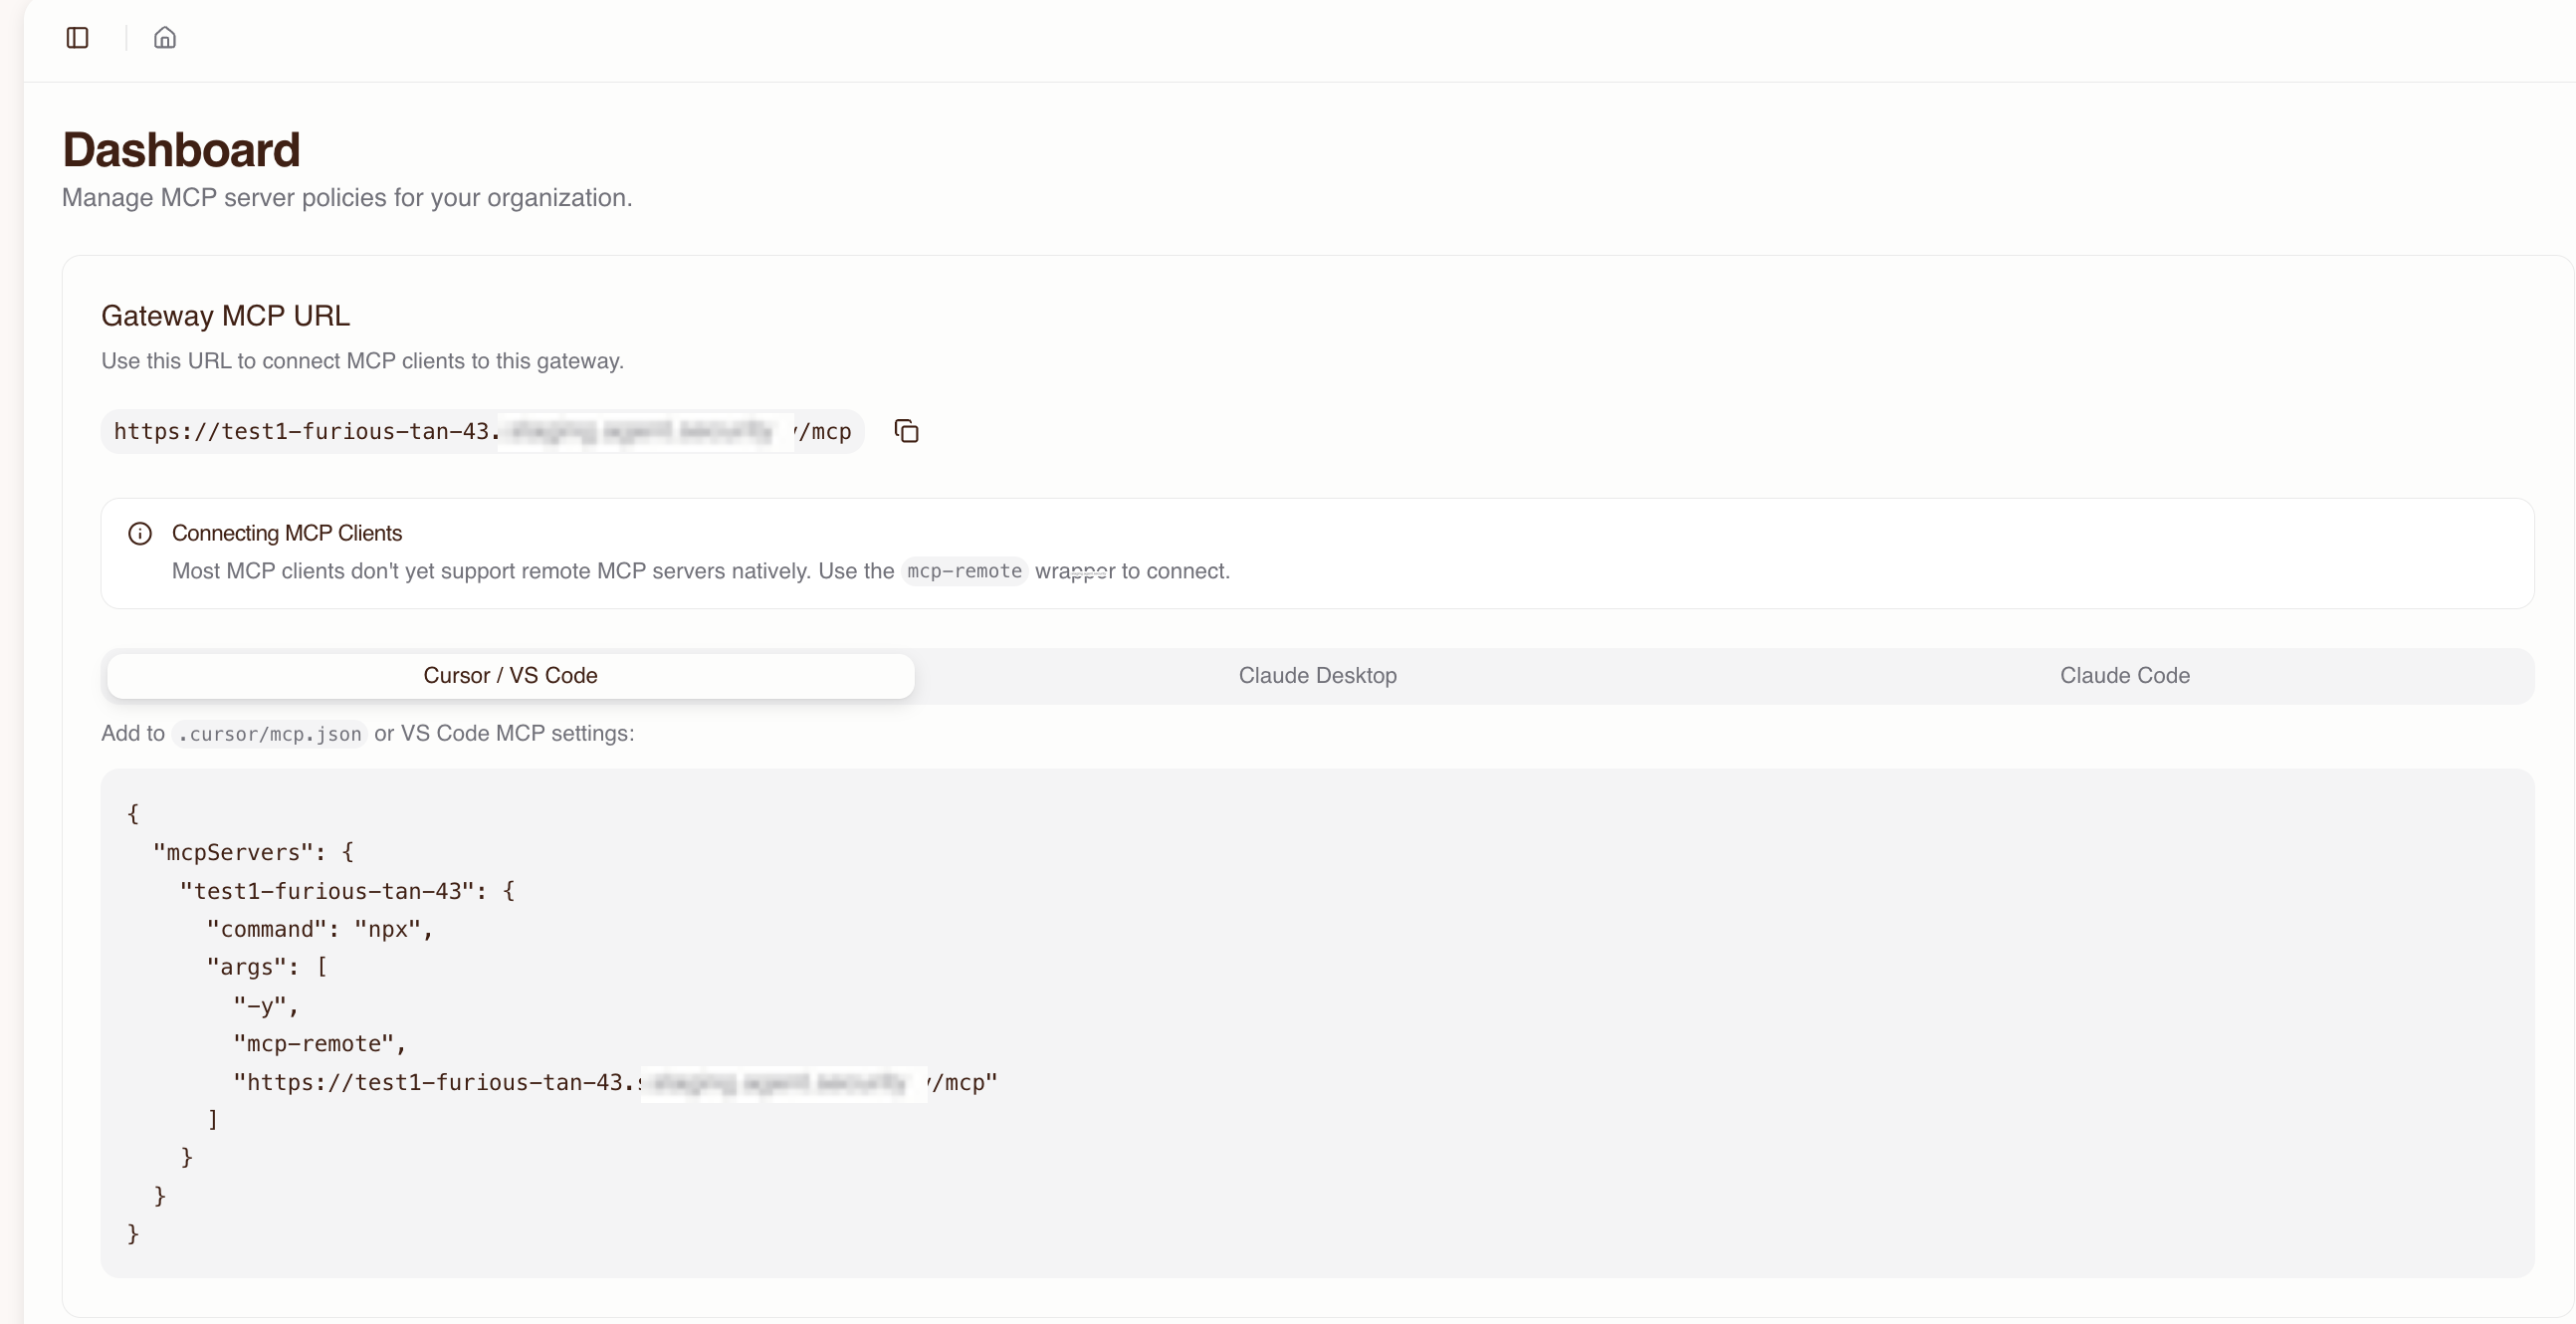
Your gateway is now live at:
https://<prefix>-<suffix>.agent.security/mcp
The Dashboard shows the full MCP URL and ready-to-copy configuration snippets for each MCP client.
4. Import MCP servers
Import the upstream MCP servers your team needs access to:
- Go to MCP Servers and click Create Server
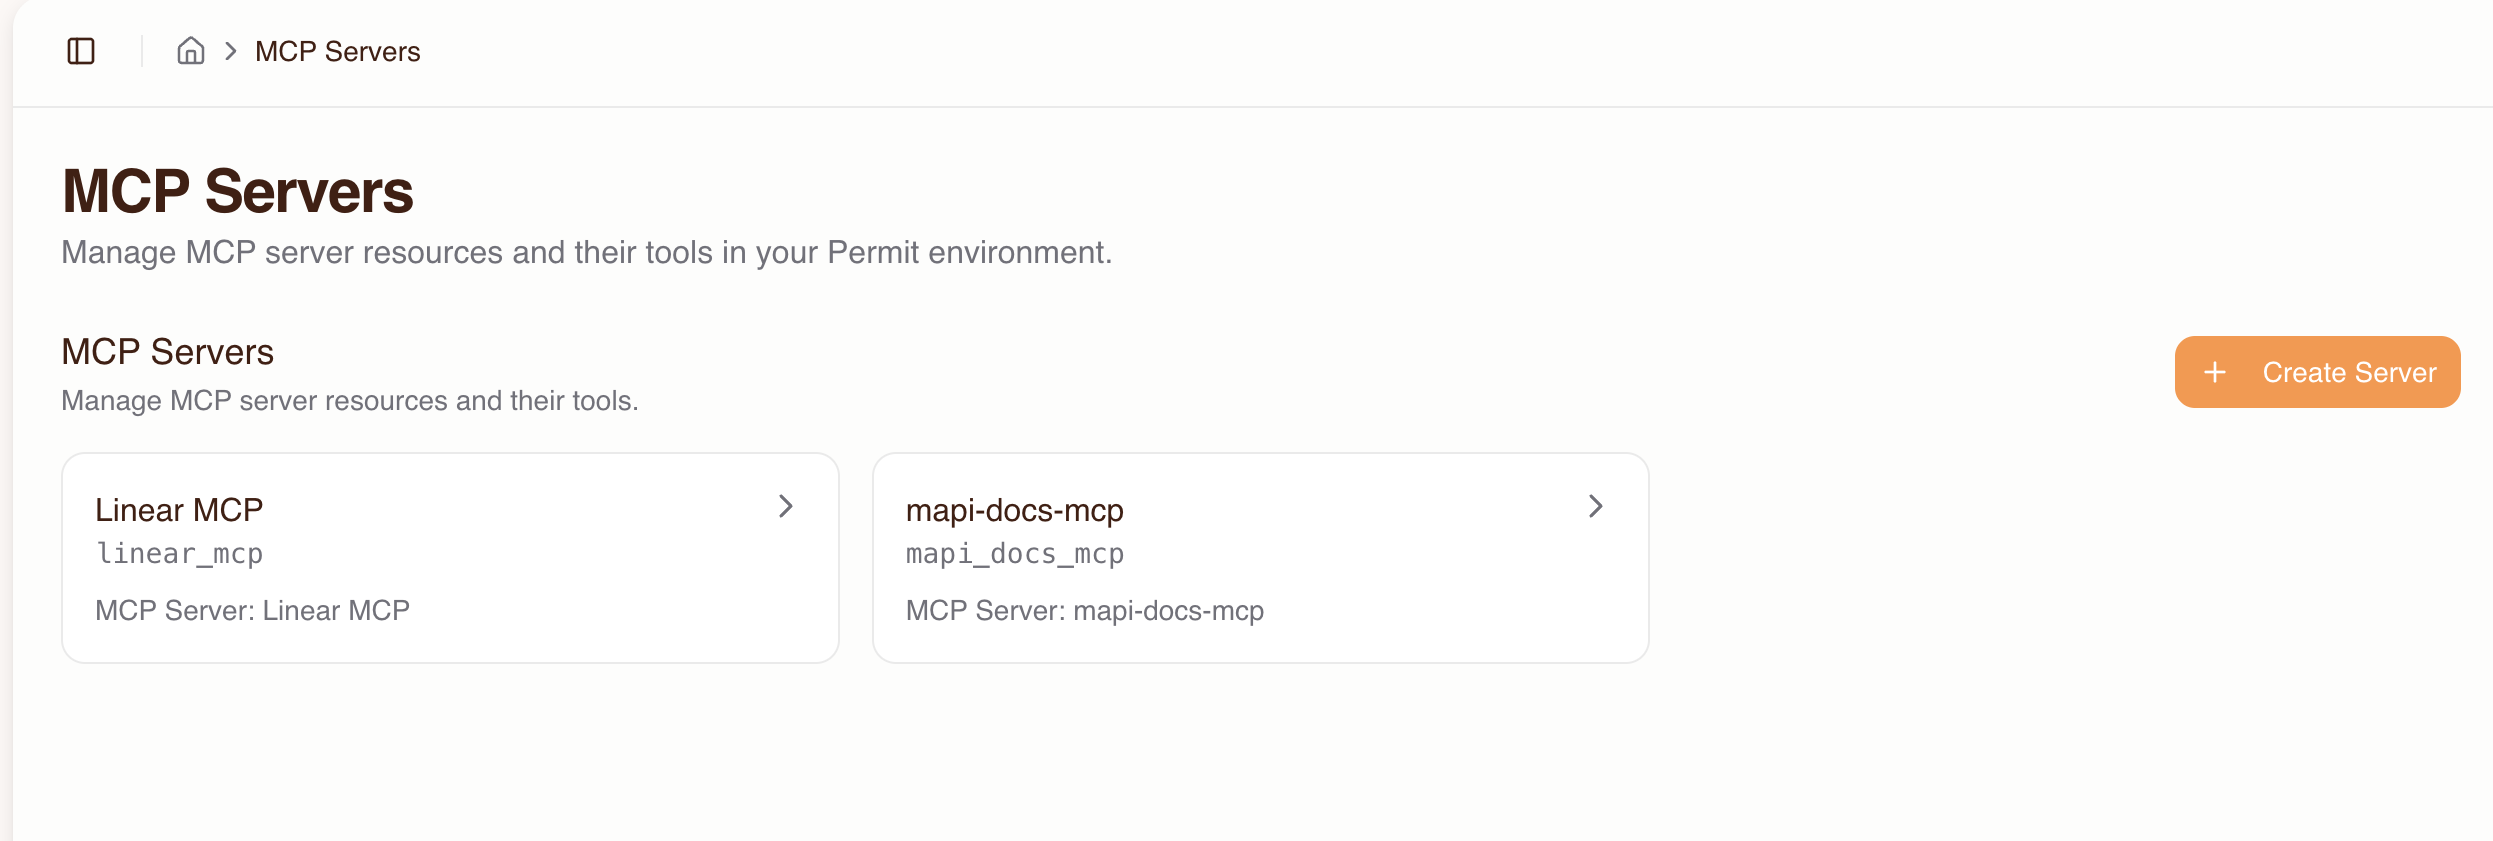
- Enter the upstream MCP server URL (e.g.,
https://mcp.linear.app/mcp) and click Connect
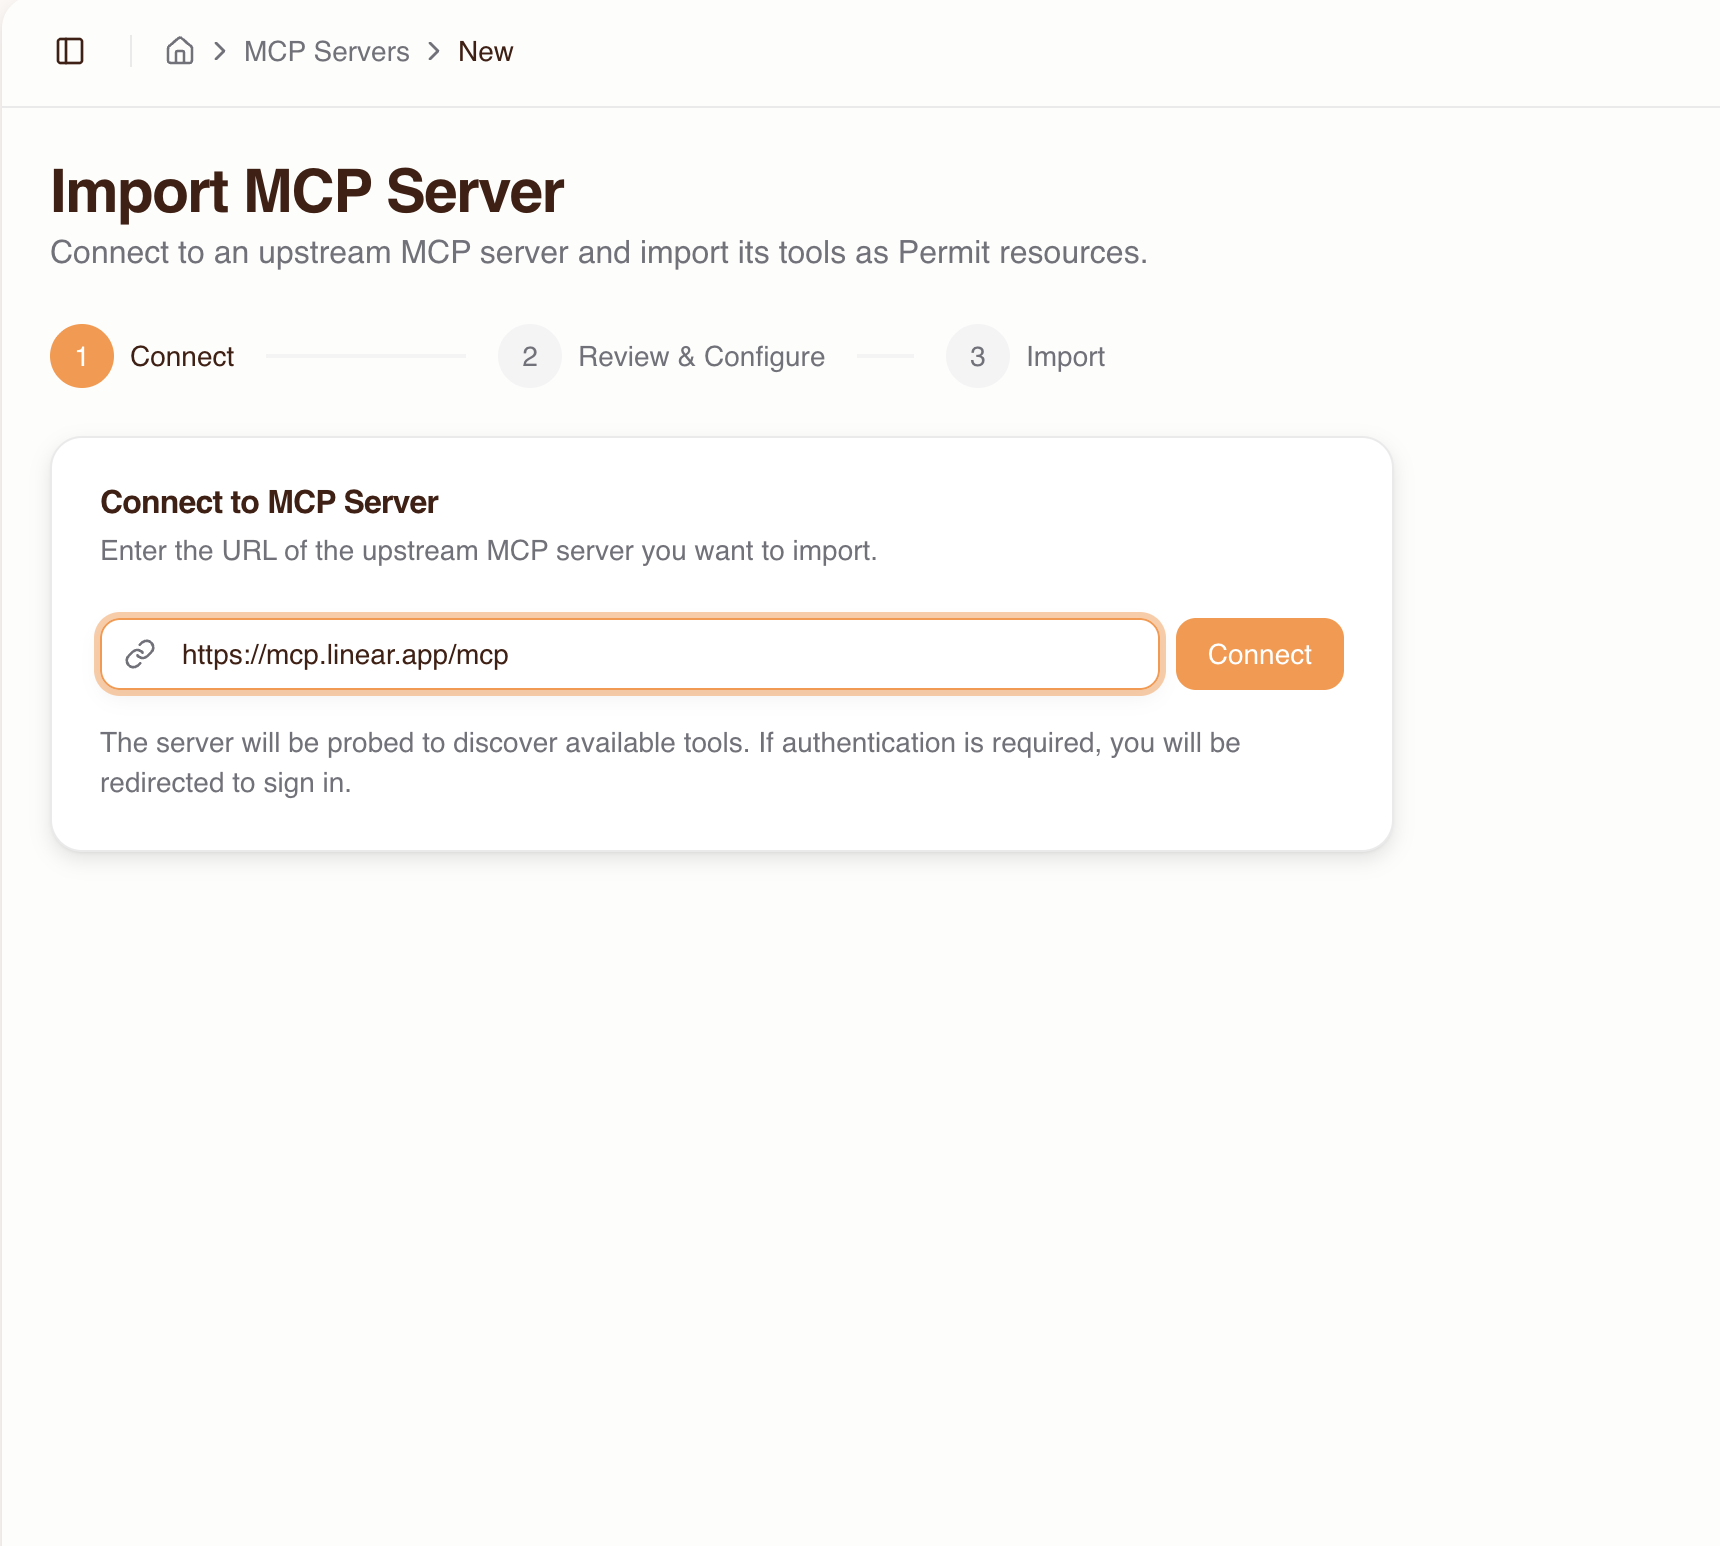
-
If the server requires authentication, you'll be redirected to sign in with the upstream provider. If the provider doesn't support automatic client registration, enter OAuth credentials (Client ID / Secret) manually.
-
Review the discovered tools — each is auto-classified with a trust level:
| Trust level | Classification | Naming patterns |
|---|---|---|
| Low | Read-only (default) | Tools not matching medium or high patterns |
| Medium | Write operations | create, write, update, send, execute, deploy, etc. |
| High | Destructive operations | delete, remove, destroy, drop, purge, etc. |
- Override trust levels and enable/disable tools as needed, then click Import
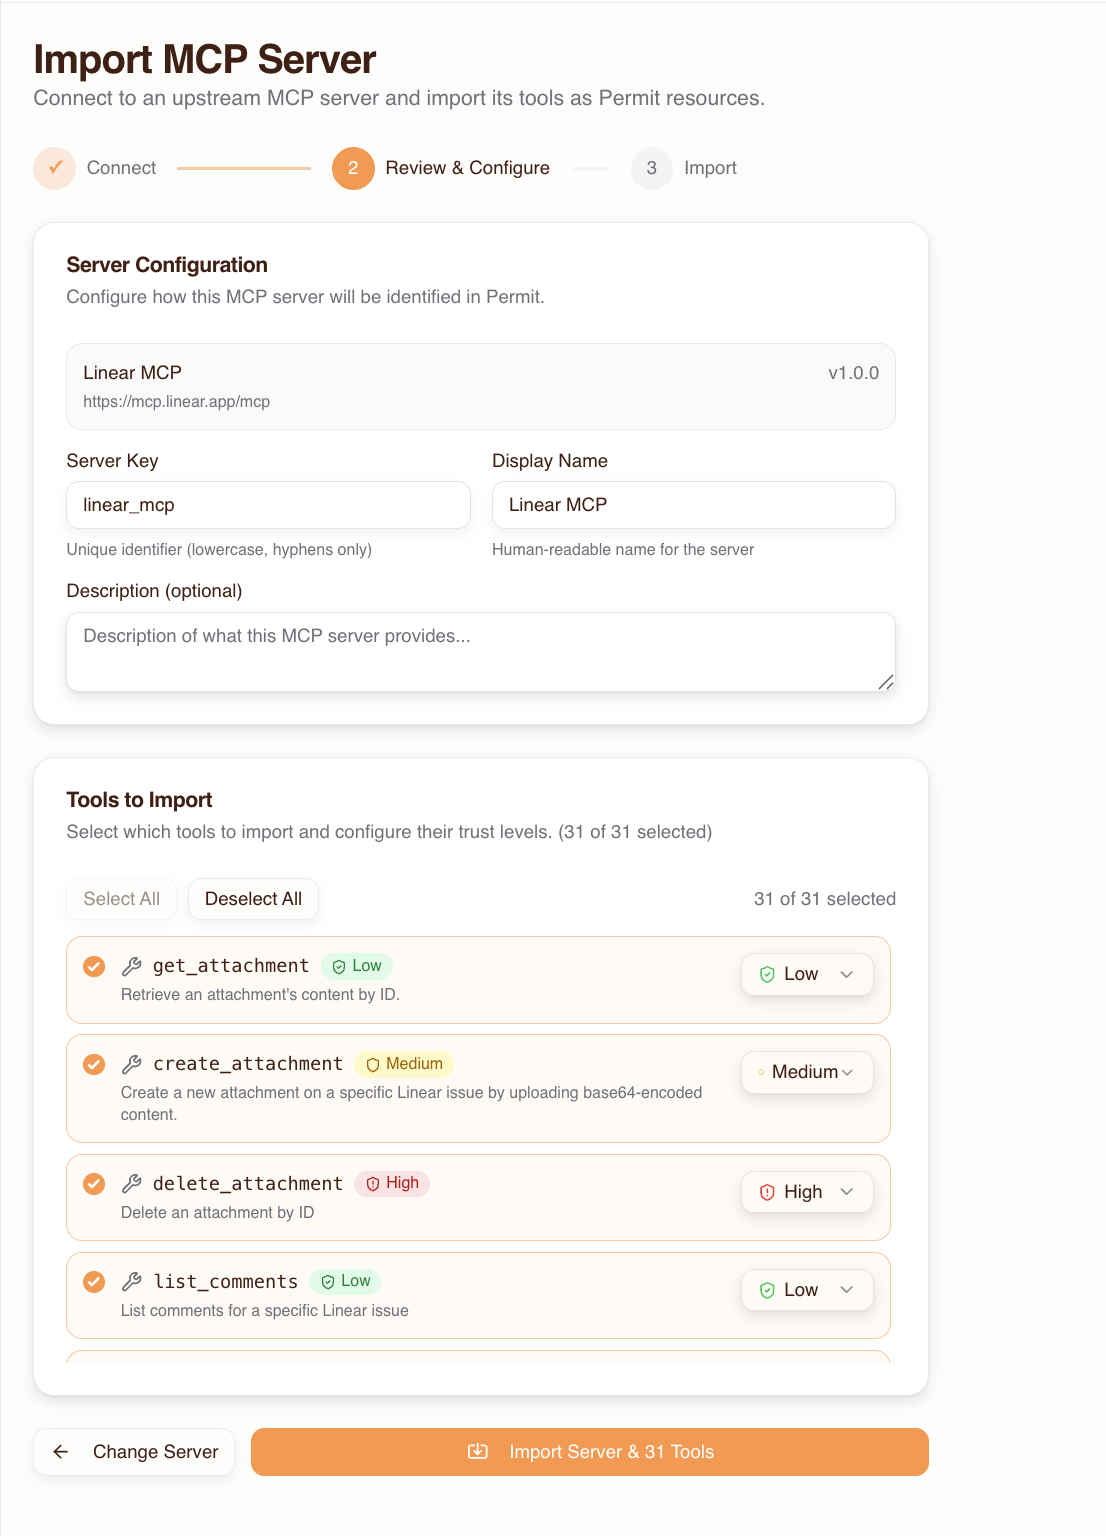
Repeat for each MCP server your team uses.
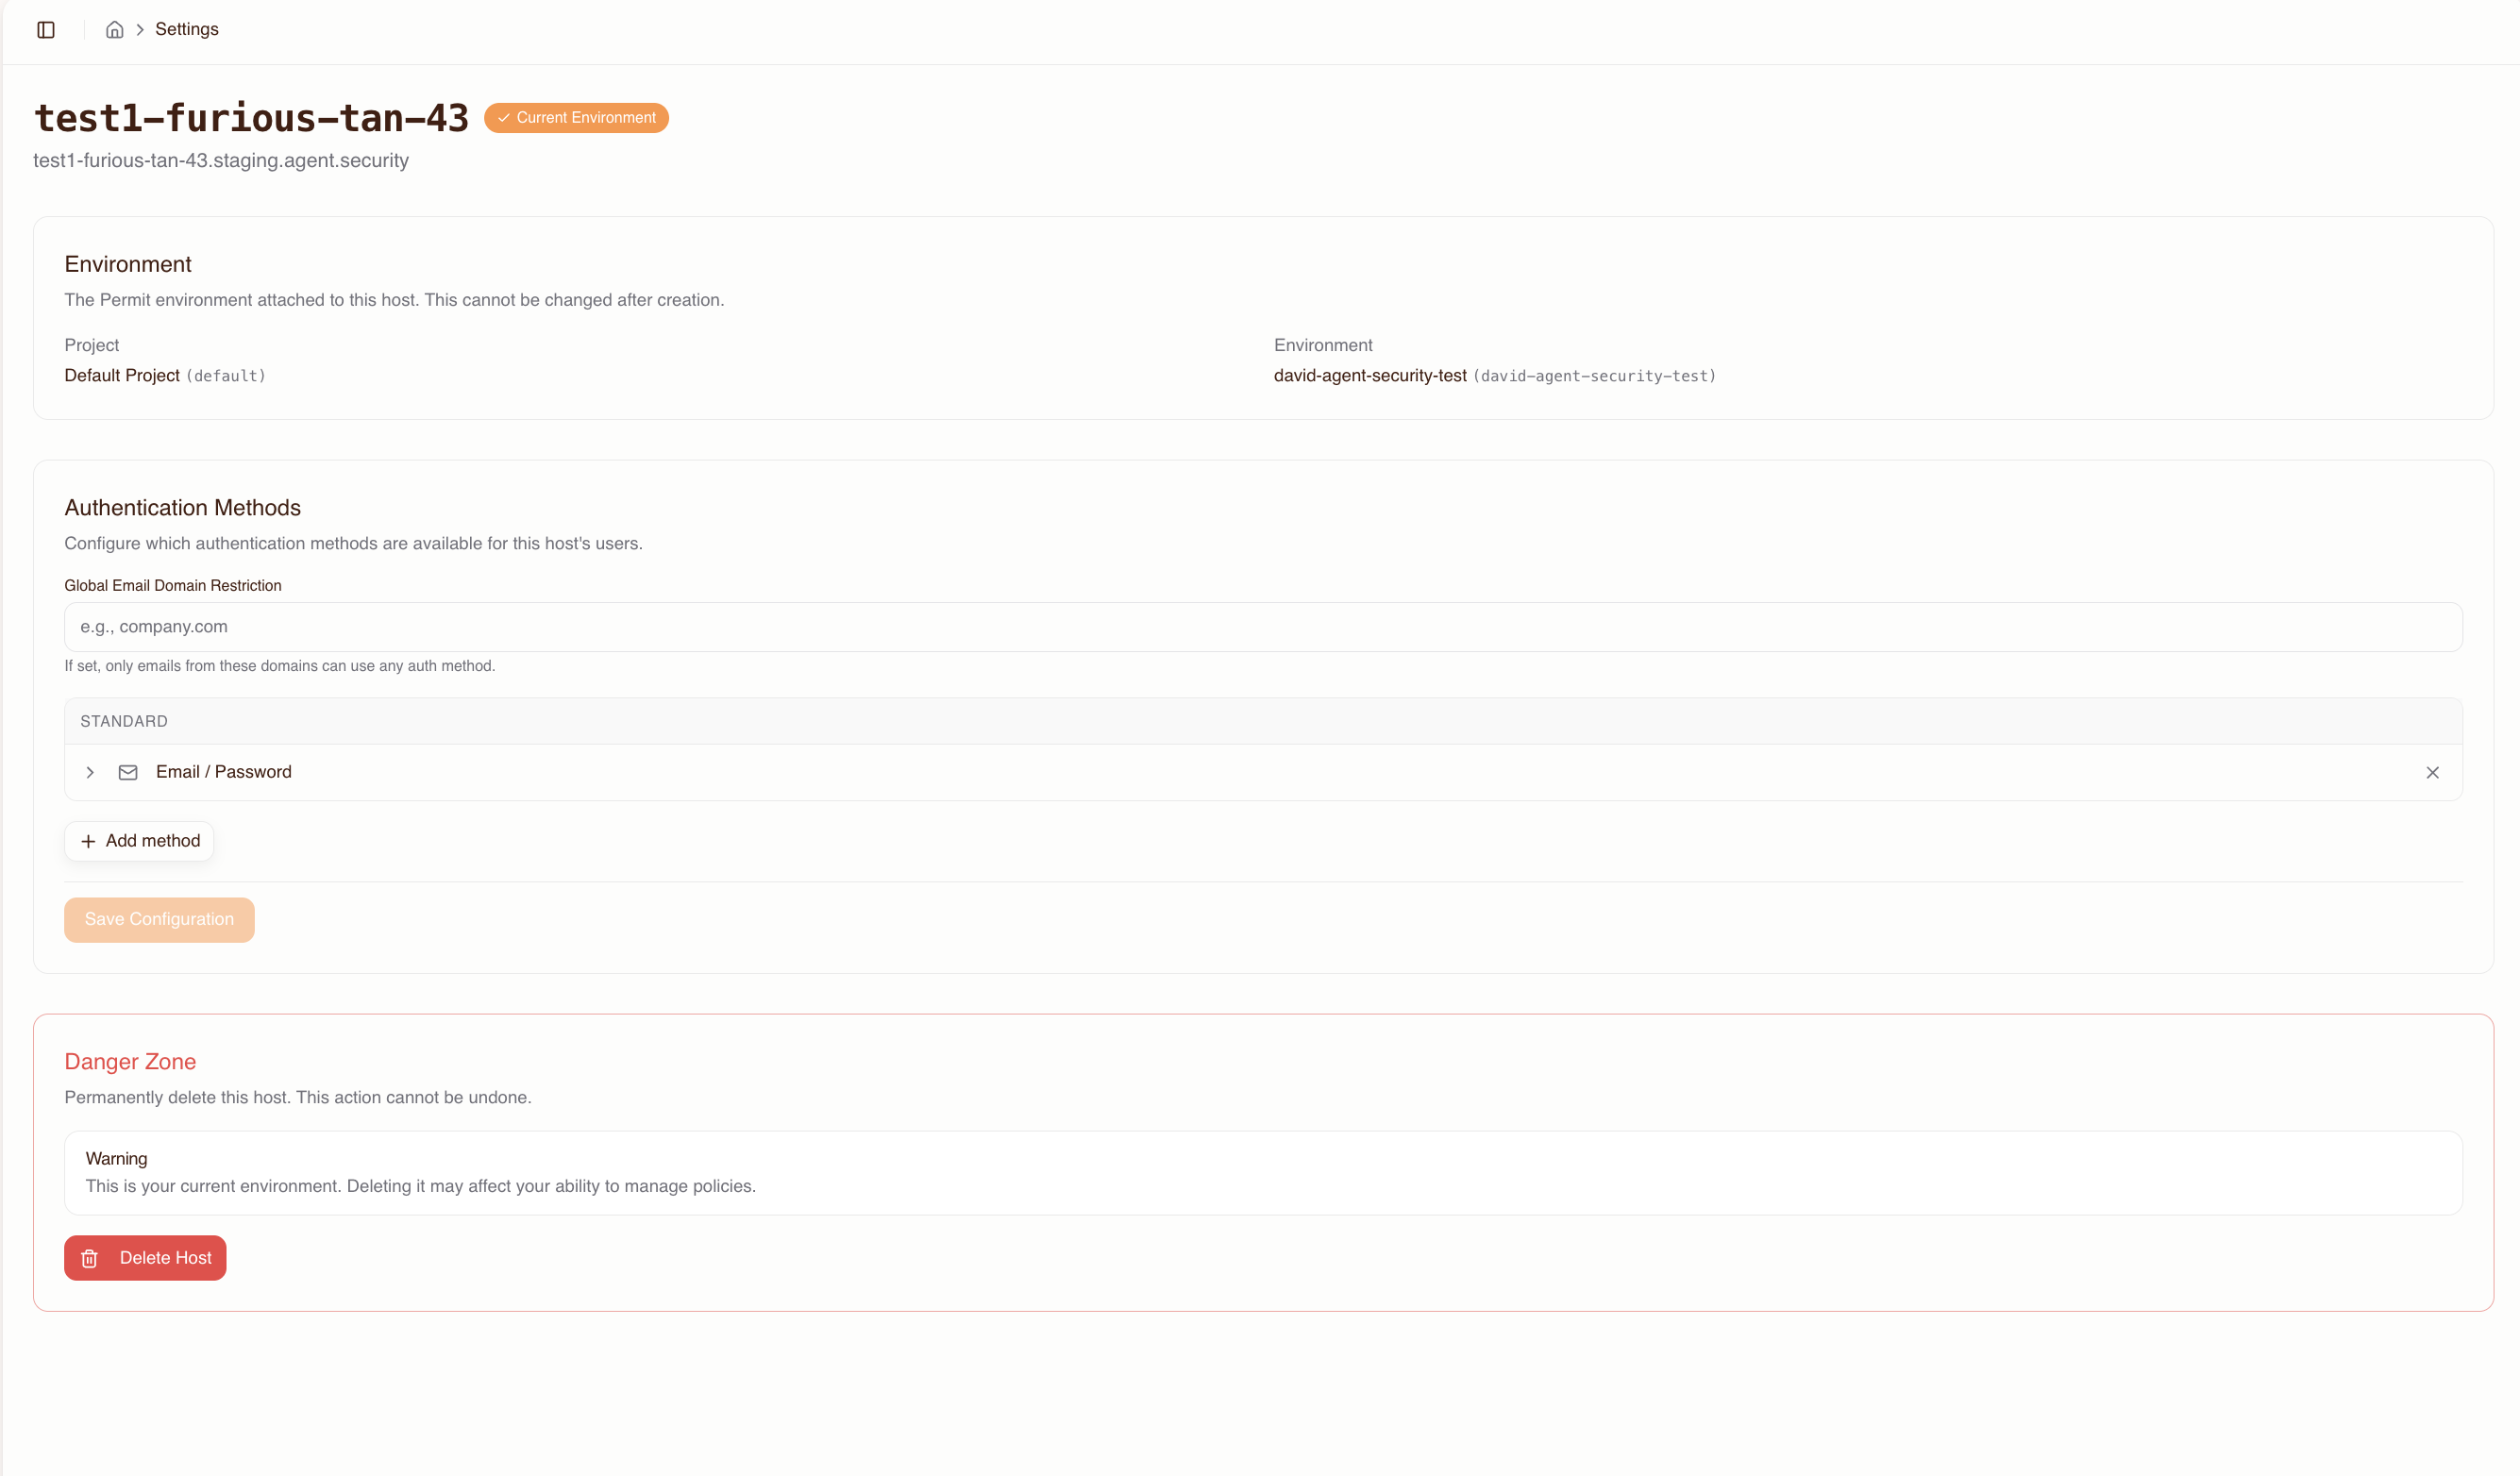
5. Configure authentication methods
Each host has its own authentication configuration controlling how users sign in during the consent flow. By default, email/password is enabled.
Go to the host's Settings (via the host selector dropdown in the header) to enable additional methods:
Available methods:
| Method | Best for |
|---|---|
| Email / Password | Quick setup, small teams |
| Email OTP | Passwordless sign-in |
| Passkeys | WebAuthn/FIDO2 credential management |
| Google OAuth | Teams using Google Workspace |
| GitHub OAuth | Developer teams |
| Microsoft OAuth | Teams using Microsoft 365 / Azure AD |
| SAML 2.0 SSO | Enterprise SSO with existing IdP |
| OIDC SSO | Enterprise SSO via OpenID Connect |
For enterprise deployments, configure SSO (SAML or OIDC) and enable domain restrictions to limit sign-in to your organization's email domain (e.g., @acme.com). You can also set up force-redirect domains so users with matching emails are sent directly to your SSO provider without seeing the login screen.
For detailed IdP-specific setup instructions (Okta, Azure AD, Google Workspace), callback URLs, domain restriction semantics, and configuration rules, see the Authentication Methods Reference.
6. Grant users access to MCP servers
By default, users have no access to any MCP server. Grant access before users connect:
- Go to the Humans page
- Add users by email (pre-authorizing them before they've signed in) or select existing users
- Click Grant Access, choose the MCP servers, and set a max trust level for each
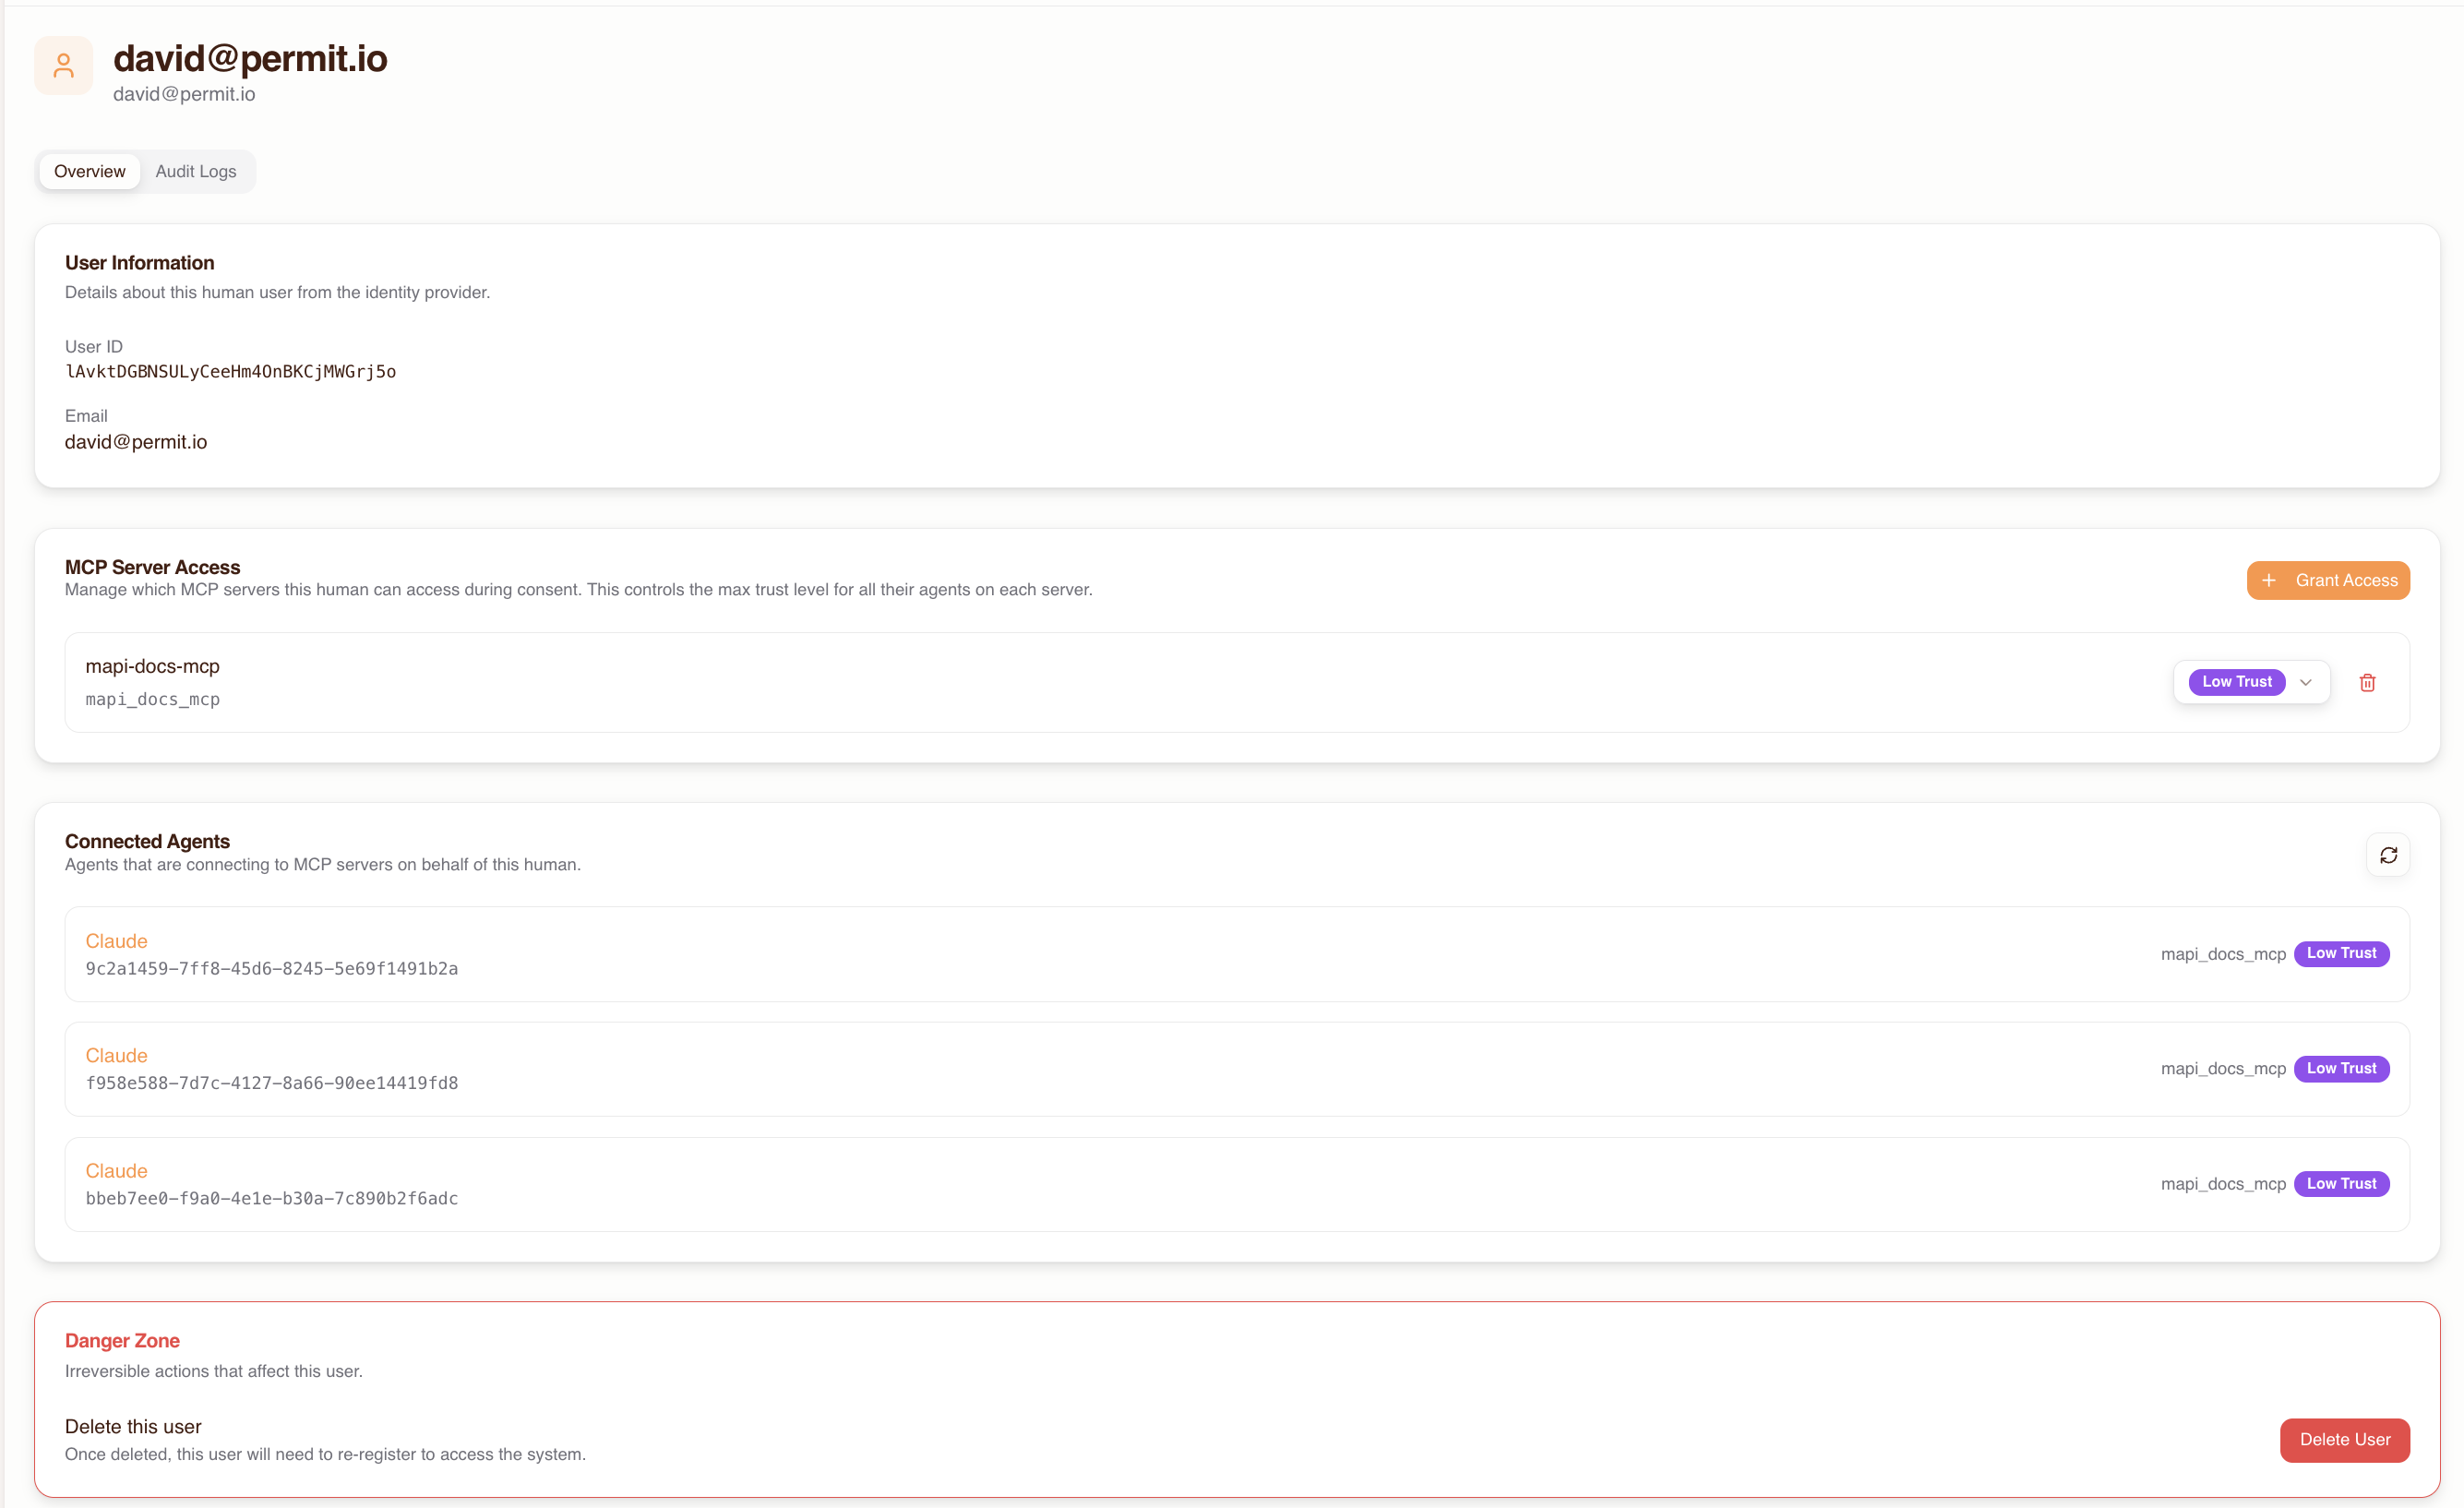
The max trust level is a ceiling — during consent, the user can only grant their agent up to this level.
If a user connects before being granted access, they'll see an empty server list in the consent screen and won't be able to proceed. Always grant access first.
7. Share the host URL with your team
Give your users the gateway MCP URL. The Dashboard provides ready-to-copy snippets for each client:
Cursor / VS Code — add to .cursor/mcp.json or VS Code MCP settings:
{
  "mcpServers": {
    "permit-mcp-gateway": {
      "command": "npx",
      "args": ["-y", "mcp-remote", "https://acme-pink-panda-6942.agent.security/mcp"]
    }
  }
}
Claude Desktop — add to your config file (~/Library/Application Support/Claude/claude_desktop_config.json on macOS):
{
  "mcpServers": {
    "permit-mcp-gateway": {
      "command": "npx",
      "args": ["-y", "mcp-remote", "https://acme-pink-panda-6942.agent.security/mcp"]
    }
  }
}
Claude Code:
claude mcp add permit-mcp-gateway --transport http https://acme-pink-panda-6942.agent.security/mcp
Pre-selected MCP server URLs
To direct users to a specific MCP server, append the upstream URL as a query parameter:
https://acme-pink-panda-6942.agent.security/mcp?upstream_mcp=https://mcp.linear.app/mcp
The consent UI will have that server pre-selected, streamlining the setup for users. The user must still have been granted access to the server — if they haven't, the pre-selection is ignored.
This is useful for distributing team-specific URLs. For example, you could share different URLs with different teams:
- Engineering:
...?upstream_mcp=https://mcp.linear.app/mcp - Marketing:
...?upstream_mcp=https://mcp.hubspot.app/mcp
Multi-host patterns
Organizations often benefit from running multiple hosts. Since each host is fully isolated — its own subdomain, Permit environment, users, and policies — you can use them to model different deployment needs.
Staging vs. production
Create separate hosts for staging and production to test configuration changes safely:
| Host | Subdomain | Permit environment | Purpose |
|---|---|---|---|
| Staging | acme-staging-... | staging | Test MCP server imports, trust levels, and auth settings before rolling out |
| Production | acme-prod-... | production | Live gateway for your team |
This lets you:
- Import new MCP servers and test trust level classifications in staging first
- Validate authentication method changes (e.g., adding SSO) before applying to production
- Grant a small group of users access in staging for testing before opening up production
Team-based hosts
Create hosts per team when different groups need different MCP servers, trust policies, or authentication methods:
| Host | Subdomain | Teams | MCP servers |
|---|---|---|---|
| Engineering | acme-eng-... | Backend, Frontend, DevOps | GitHub, Linear, Sentry |
| Marketing | acme-mktg-... | Content, Analytics | HubSpot, Google Analytics |
| Security | acme-sec-... | InfoSec, Compliance | AWS, Datadog, PagerDuty |
Each host can have its own:
- Set of imported MCP servers
- Trust level defaults per tool
- Authentication methods (e.g., SSO for enterprise teams, email/password for contractors)
- Domain restrictions
Single host for small teams
For smaller organizations, a single host is often sufficient. One host with all MCP servers and all users keeps management simple. You can always add more hosts later as needs evolve.
User onboarding at scale
Pre-granting access to all users
For large teams, you can pre-authorize users by email before they've signed in. This means the first time they connect, they see their granted MCP servers immediately and can complete the consent flow without waiting for admin action.
Workflow for onboarding a new team:
- Collect user emails (from your HR system, team roster, etc.)
- Add each user on the Humans page
- Grant access to the relevant MCP servers with appropriate max trust levels
- Distribute the gateway URL
Domain restrictions for automatic user filtering
Use domain restrictions on authentication methods to automatically limit which email addresses can sign in. For example:
- Set an allowed domain of
@acme.comon all authentication methods - Users with
@acme.comemails can sign in; others are rejected
This is particularly useful with SSO — configure a force-redirect domain so @acme.com users go straight to your identity provider without seeing the login screen.
Domain restrictions can be set:
- Globally — applied to all authentication methods on the host
- Per method — different domains for different auth methods (e.g.,
@acme.comfor SSO,@contractor.acme.comfor email/password)
Migrating from direct MCP server access
If your team is currently connecting MCP clients directly to upstream MCP servers (e.g., https://mcp.linear.app/mcp), you can migrate to Permit MCP Gateway with minimal disruption:
- Create a host and import the same MCP servers your team is already using
- Review trust levels — verify the auto-classified trust levels match your security requirements, and override where needed
- Pre-grant access to all current users at the appropriate trust levels
- Distribute pre-selected URLs — use
upstream_mcpquery parameters to create URLs that point to each user's current MCP server:https://acme-prod-xyz.agent.security/mcp?upstream_mcp=https://mcp.linear.app/mcp - Update MCP client configurations — swap the upstream URL for the gateway URL in users' config files
- Users complete the consent flow — on first connection, users authenticate, select their trust level, and authorize their agent
After migration, all tool calls flow through the gateway — giving you authentication, authorization, and audit logging for every interaction.
Start with a small pilot group. Migrate a few users first, verify everything works, then roll out to the full team. You can keep direct MCP access running in parallel during the transition.
Rollout Guidance
Adopting Permit MCP Gateway incrementally reduces risk and builds organizational confidence. This section describes a recommended rollout approach.
Phase 1: Pilot (1–2 weeks)
Goal: Validate that the gateway works with your MCP servers and clients, and that the setup matches your security requirements.
- Create a single pilot host linked to a non-production Permit environment
- Import 1–2 MCP servers that your team already uses (e.g., GitHub, Linear)
- Grant access to 2–3 pilot users at low (read-only) trust to start
- Have pilot users connect their MCP clients through the gateway and complete the consent flow
- Review audit logs — verify that tool calls are being logged correctly and that allowed/denied decisions match expectations
- Test trust level enforcement — confirm that destructive operations are denied at low trust, and that raising trust to medium enables write operations
What to look for:
- Are all expected tools discovered during import?
- Do trust level classifications match your security expectations? Override any that don't.
- Is the consent flow smooth for your authentication method (SSO, OAuth, email)?
- Are audit log entries clear and useful?
Phase 2: Controlled Expansion (2–4 weeks)
Goal: Expand to more users and servers while keeping risk manageable.
- Raise trust levels for pilot users based on Phase 1 findings — move from low to medium where appropriate
- Import additional MCP servers as needed
- Onboard a broader group of users — pre-authorize by email and distribute the gateway URL
- Require consent/approval for sensitive tools — keep destructive (high trust) tools restricted to specific users who need them
- Review audit logs regularly — identify access patterns, unexpected denials, and any tools that need reclassification
Phase 3: Production Rollout
Goal: Full team adoption with established security policies.
- Create a production host linked to a production Permit environment (if you used a staging environment for the pilot)
- Migrate users — update MCP client configurations to point at the production gateway URL
- Remove direct MCP server connections — ensure all MCP traffic flows through the gateway
- Configure SSO (SAML/OIDC) and domain restrictions for enterprise authentication
- Set up monitoring — establish a process for reviewing audit logs and responding to unexpected access patterns
Rollout Principles
- Start restrictive, then expand — begin with low trust and raise incrementally based on observed behavior
- Pilot before production — use a separate staging host to validate configuration changes
- Review before broadening — inspect audit logs after each phase before adding more users or servers
- Document trust level decisions — record why specific tools were classified at specific levels, especially any manual overrides
- Keep direct access disabled — remove direct MCP server connections from client configs to prevent agents from bypassing the gateway